Administration Application
Table of contents
Overview
The Administration application provides management of master data entities used across the entire system. Access it via the Administration menu item in the topbar (requires the ManageUsers permission).
Functionalities
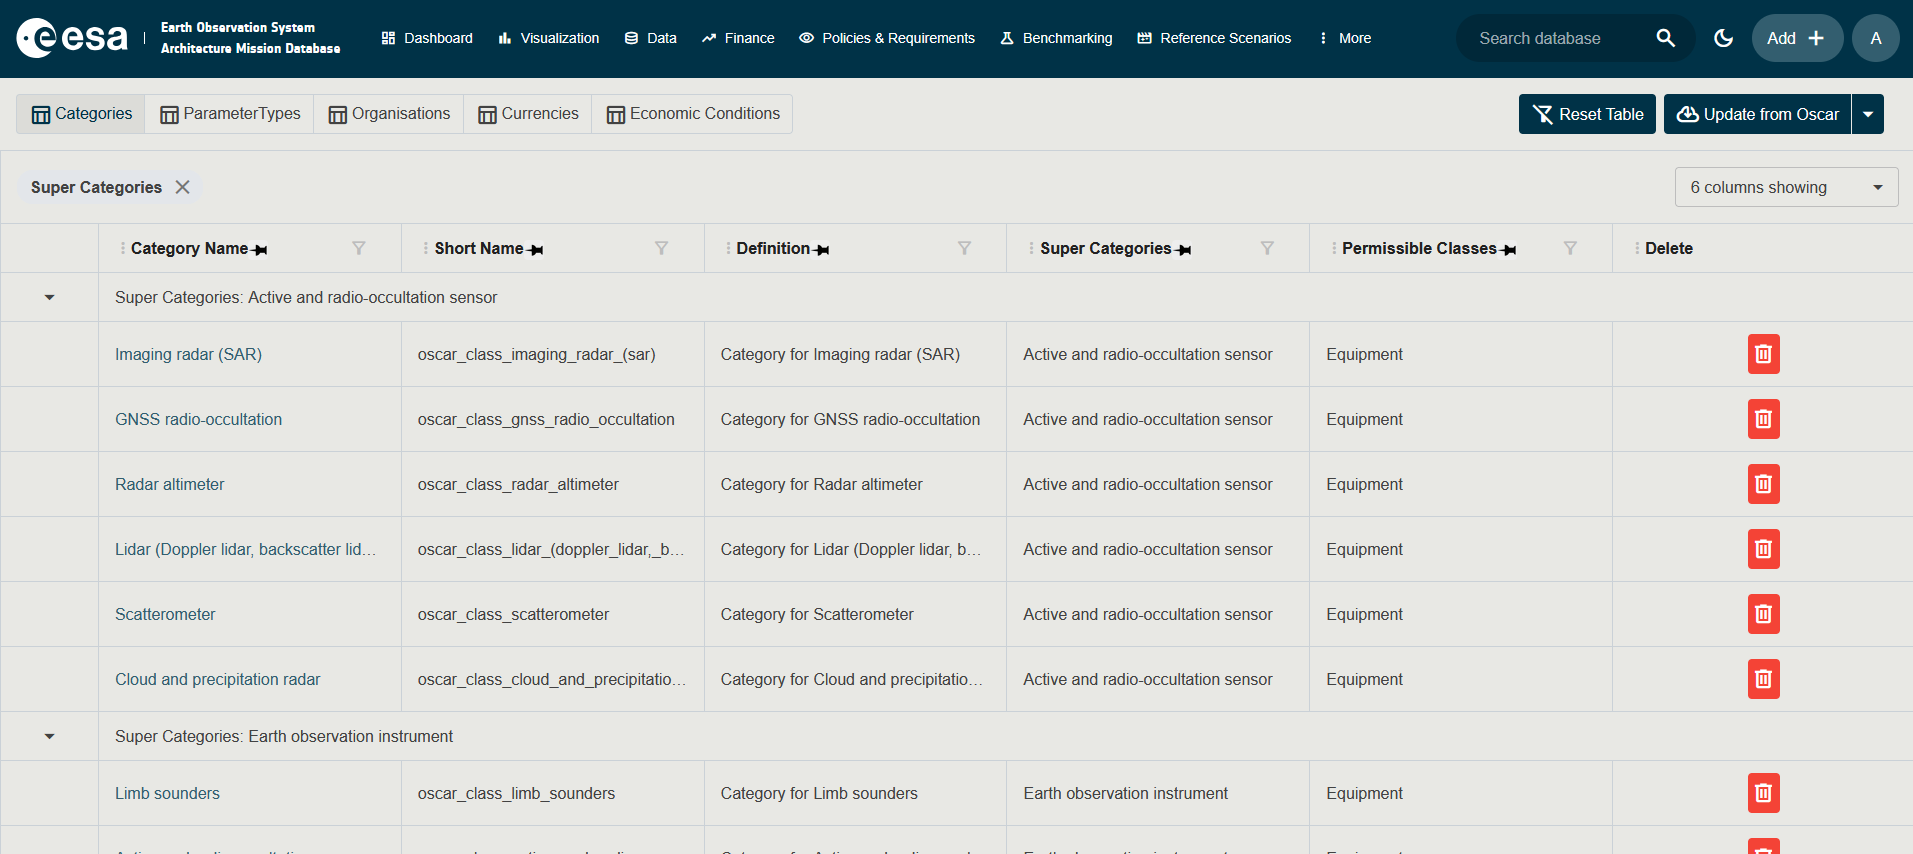
Use the selector bar at the top left to switch between administration areas:
| Administration Area | Required Permission | Description |
|---|---|---|
| Categories | ManageUsers | Create and manage the hierarchical category system. |
| Parameter Types | ManageUsers | Define parameter types that can be assigned as values to entities. |
| Organisations | ManageUsers | Manage agencies and suppliers involved in programmes. |
| Currencies | AccessProgrammaticData | Manage currencies used in financial / programmatic data. Only visible to users with AccessProgrammaticData. |
| Economic Conditions | AccessProgrammaticData | Manage economic condition presets used in financial calculations. Only visible to users with AccessProgrammaticData. |
In addition to the in-application administration areas, two external tools are accessible from the navigation bar for users with the appropriate permissions:
| External Tool | Required Permission | Description |
|---|---|---|
| User Administration | ManageUsers | Opens the Keycloak admin console for creating and managing user accounts and role assignments. See User Administration (Keycloak). |
| PG Admin | ImportExportDatabase | Opens the PG Admin web interface for direct PostgreSQL database access. See PG Admin. |
For a detailed description of all roles and the permissions they grant, see Roles and Permissions.
Each area displays a table listing all existing items with full CRUD support (create via the floating + button, edit, delete, duplicate from the detail page).
Toolbar Actions
In the top right of the page:
| Button | Description |
|---|---|
| Reset Table | Clears all column filters, sort orders, pinned columns and grouping for the currently displayed table. |
| Update from Oscar | Synchronises the master data from the WMO OSCAR catalogue (Observing Systems Capability Analysis and Review). Clicking the main button starts the Oscar import directly. The button is disabled while an import is in progress. |
| Update from CEOS | Available from the split-button menu next to Update from Oscar. Opens an upload dialog where you provide the CEOS (Committee on Earth Observation Satellites) Missions and Instruments Excel files. |
Importing from external catalogues can take several minutes. Existing items are matched by name and updated in place; new items are added.
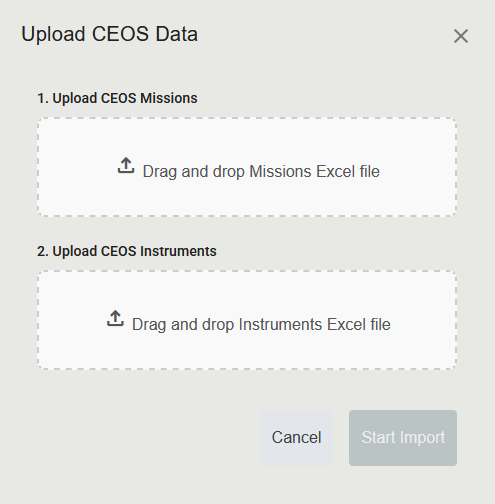
Importing from CEOS
The CEOS update is a two-step flow.
- Open the split-button menu next to Update from Oscar and select Update from CEOS. A dialog titled Upload CEOS Data opens.
- The dialog contains two drop zones. In 1. Upload CEOS Missions, drag the missions Excel file onto the zone, or click the zone to open the file browser. Only
.xlsand.xlsxfiles are accepted. - In 2. Upload CEOS Instruments, do the same for the instruments Excel file.
- You may upload one file or both. The Start Import button is enabled as soon as at least one file is selected.
- Click Start Import. The upload dialog closes and the Data Import Review dialog opens (see below). To abandon the upload at any point, click Cancel.
Reviewing an Import
Both the Oscar and CEOS imports finish by opening a Data Import Review dialog. The dialog lets you confirm exactly which changes will be written to the database before they are committed.
- While the file is being analysed, a spinner is shown with progress text. Wait for the analysis to finish.
- Once the analysis is complete, the dialog displays a table of Proposed Changes. The header reads Data Import Review (N Items) where N is the number of detected changes.
-
Each row in the table represents one change and shows:
Column Description Checkbox Tick or untick to include this change in the commit. The header checkbox toggles all rows. Action The kind of change (for example, Add or Update). Class The type of entity affected (for example, Mission, Payload). Identifier The name or short name of the entity. GUID The internal identifier of the entity. Detailed Changes The list of property changes that will be applied. - Untick any change you do not want to commit.
- Click Commit Selected Changes to write the ticked changes to the database. The button is disabled if no rows are ticked.
- While the commit runs, the dialog shows a progress spinner. When it finishes, a green check icon and Operation Successful message appear, or a red error icon and Operation Failed message if something went wrong.
- Click Close to dismiss the dialog. The Administration table refreshes automatically.
If the analysis finds no differences between the imported file and the local database, the dialog instead shows the message No changes detected. Local data is already in sync. and only a Close button.

See also Terms and Abbreviations for detailed definitions of each entity.